8.31.2010

Lemon Cookies and Birthday Wishes

There are two things I know for sure about my sister-in-law:


1) She loves coffee.


2) She admires Laura Ingalls Wilder as much as I do. 


Last summer, we had the opportunity to visit LIW's historic home in Mansfield, MO. Laura and her husband Almanzo built this Little House on Rocky Ridge, where they raised their daughter Rose and Laura first penned the Little House on the Prairie Series. After the tour, we went to the museum gift shop and I purchased LIW's cookbook! How awesome is that? I was so excited to try all the recipes she created and feel connected with my childhood hero. Well, needless to say, it has taken a rather centrally located spot on my cookbook shelf...though I have never had the opportunity to try a single recipe. 

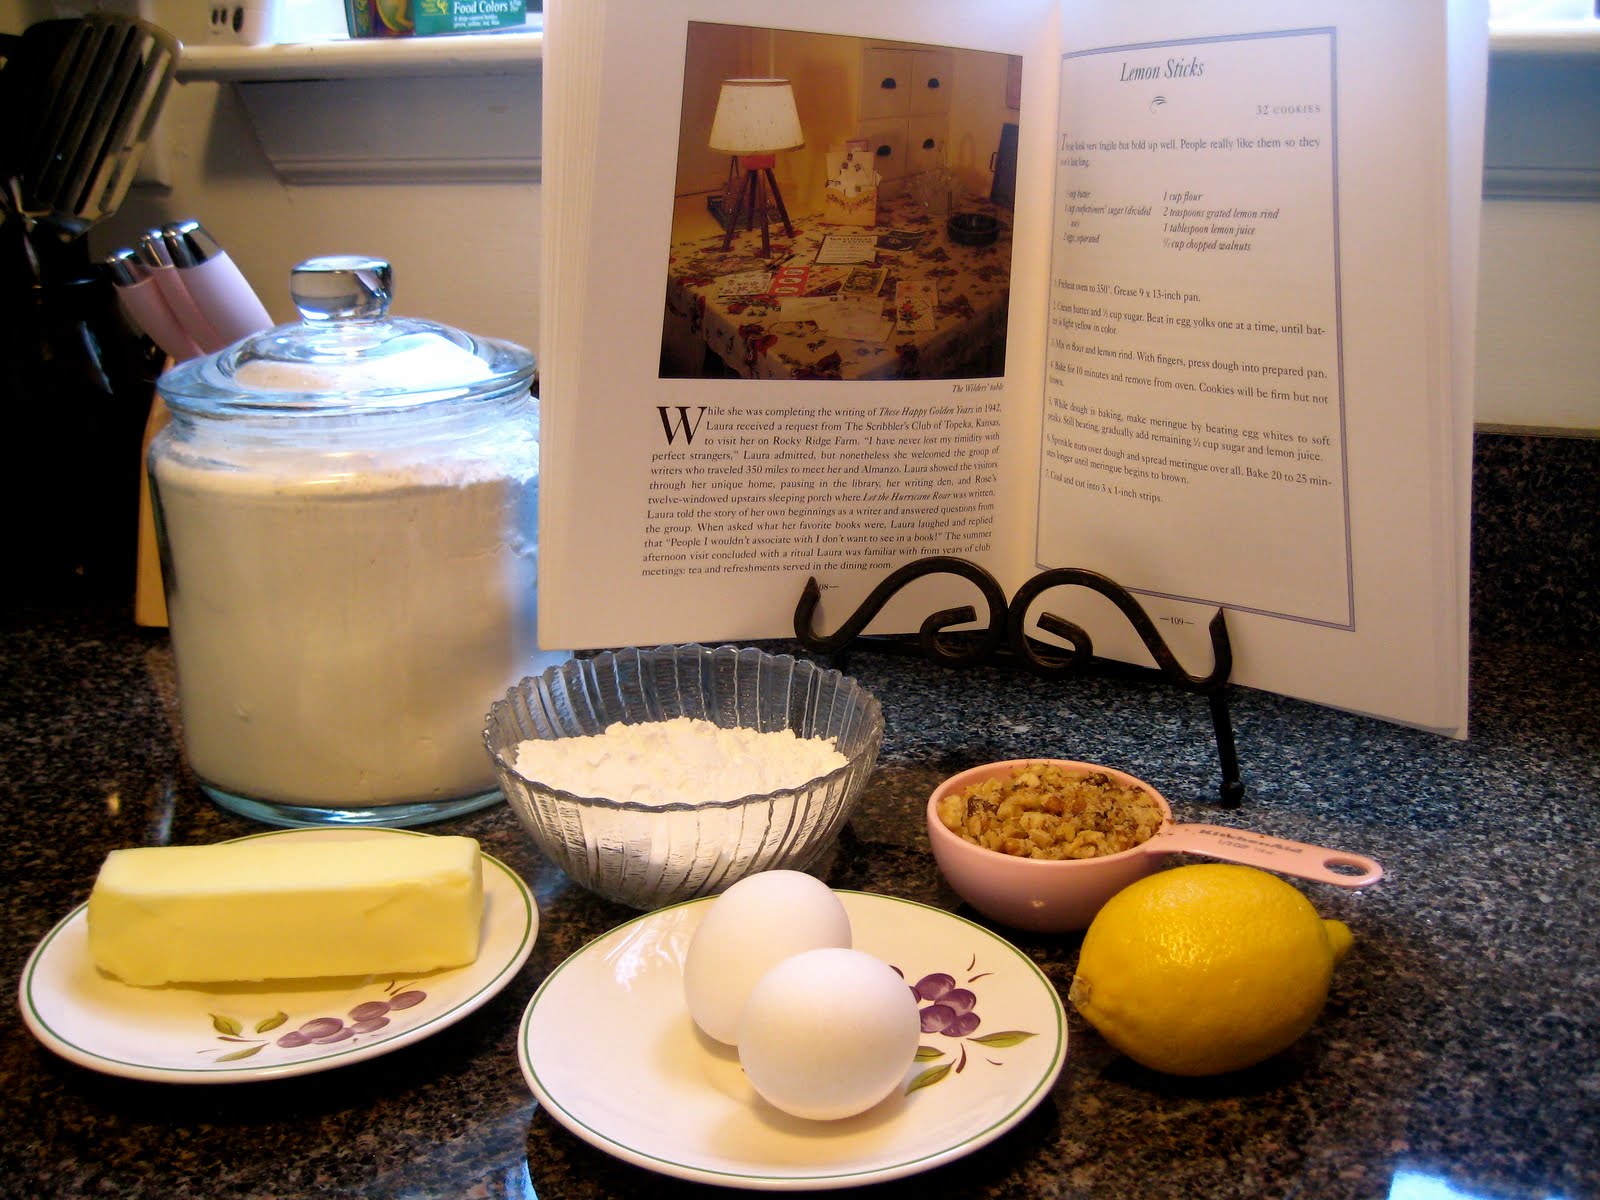
With KHo's birthday around the corner, I was trying to come up with something yummy to share, but couldn't decide on anything in particular (as usual). And then it hit me...what better time to try something out of Laura's cookbook?? I flipped through the pages and landed on a dainty lemon tea cookie recipe. Perfect! (Or so I thought, apparently KHo's not a fan of lemon. Details, details.)

These were super easy, and a nice little tea cookie. 

Lemon Sticks
Recipe by Laura Ingalls Wilder
Adapted by me :-)

What you'll need:

1/2 cup butter
1 cup confectioners' sugar
2 eggs, separated
1 cup flour
1 lemon, zest and juice
1/2 cup chopped walnuts 


1) Preheat oven to 350 degrees. Grease 9 x 13-inch pan.

2) Cream butter and 1/2 cup sugar until light and fluffy. Add egg yolks, one at a time, until batter is yellow.


3) Mix in flour and lemon zest. With floured fingers, spread mixture into prepared pan.


4) Bake for 10 minutes and remove from oven. Cookie will be firm, but not brown.

5) While dough is baking, make meringue by beating egg whites to soft peaks. While beating, gradually add remaining 1/2 cup sugar and lemon juice.

6) Sprinkle nuts over dough and spread meringue over all. Bake for 20-25 minutes until meringue begins to brown. 


7) Cool and cut into 3 x 1-inch strips.


Now grab a frothy cup of goodness and curl up with a copy of "Little House on the Prairie" and enjoy your tasty piece of history. 


"I am beginning to learn that it is the sweet, simple things of life which are the real ones after all"
                                                    - Laura Ingalls Wilder
    

8.24.2010

Traveling decor


I always seem to struggle with decorating large areas, such as the space above our bed. For some reason, my brain cannot ever seem to come up with a "vision" and when it does, it is either way too expensive or difficult to attempt at the moment. When faced with this challenge after our latest move, I decided to let the space remain empty until I came up with the perfect idea. Well that lasted about a week before I hung an ugly tolerable print that came in a really pretty frame from Homegoods (aka: Heaven on Earth). When I purchased this gem, I had every intention of replacing the image with something closer to my taste...but life happened and a year (and two moves) later, there it hangs same as the day I bought it, just in a new location. Oh well. Someday, right? 

Well a month later, I haven't come up with that "aha!" idea, but once we got some paint on the wall, I remembered a little project I did to fill up yet another large space in our old apartment. 


I called these "Traveling Decor" because these babies have truly been all over the place in the last year! They've gone from my living room in PA, to my sister's apartment at State College, back into my living room in NJ and finally in the overwhelmingly-large-space-that-I-don't-know-what-to-do-with above our bed. At first I hung them as squares, until my creative sister discovered that hanging them on their side (as diamonds) creates an entirely new neat-o look! She's such a smarty-pants!

Wanna try to make some? They are SO easy and can be customize to fit any room in your home!

What you need: (makes 6 pieces)

2 - 12 x 36 inch pieces of styrofoam ( I got mine at A.C. Moore)
1 - spool of 1.5 inch satin ribbon
6 - sheets of scrapbook paper
6 - sawtooth picture hangers
12 - small nails
a knife
straight pins with a small head, not the pretty plastic ones with lots of colors.

Now remember, this is my first tutorial. Be kind. I did this project a long time ago, but happened to have some of the pieces left over to use as a guide. So without taking anything apart, here's the general idea. You'll follow, promise.

First, carefully cut your large styrofoam rectangle into three equal pieces, making three, 12x12 squares.


Like so..and repeat with the second rectangle.
  
                                                                      
Wrap the edge in ribbon, using the straight pins to hold it in place. About  6-7 pins on each side should work. Don't forget to fold your corners before your pin it all down. 


Once that is done, and you have gone through more straight pins than you thought you owned, measure to the middle of the square and add your sawtooth hanger. The little nails are not the greatest with the styrofoam, so I used straight pins to hold it on around the edges. Don't worry about being neat here, no one will see the back! 


Ok, now you can add your paper! Make sure that the pattern is right-side-up based on the sawtooth hanger...otherwise you'll have to un-pin it which is a super pain! (Personal experience? naaaahh) The beauty of this project is that the styrofoam rectangle turns into the 12x12 squares...exactly the size of a piece of scrapbook paper! How awesome is that?? Couldn't be easier! 


And now for the fun part! What kind of design will you make? On the first wall, we did a 4 x 2 all square pattern. My sister, KHo, used a combination of squares and diamonds. For our new bedroom addition, SP and I went with all diamonds, and I just love it! (They are a girl's best friend, no?) 


The funny thing about this pattern is that it was completely unintentional. We attempted what ended up looking like an "M" on the wall (without the bottom two), tried a few other options, and discovered this. I am really happy with it. I wish the lighting in the pictures was better so you could see the real colors, but my flash is broken. Sad face. 

Since these are so light, you will have no problem hanging these with a small nail or even a pushpin! (Hey, use what's at hand!)

                                                                                                                                                                                  
Done! Now step back and enjoy your work! 


Oh, and for you thrifty shoppers out there...the set of sconces was on clearance at Kohls for less than $10. I love a good deal. :-)

8.21.2010

S'more Rascal Flatts!


Last weekend a group of us went to the Rascal Flatts concert in Scranton, at Montage Mountain.


What an adventure! We got out there with no problem, found an awesome spot to sit, and enjoyed some yummy treats! Katie and I sought out some guitar shaped margaritas, but decided against the splurge when we discovered that this tiny drink was $13! Sheesh! Alas, we settled for some bottled water and a massive amount of Twizzlers (apparently my mother and I think alike..we ended up with 5 family sized packs!)

Once Rascal Flatts came on the night just flew by! We danced and sang so loud it would have been embarrassing, but everyone else was doing the same. Though they did not play my favorite song, it was a fantastic concert and I would go again in a heartbeat!

And as for snacks...we had some yummy stuff going on! Pizza, sandwiches, chocolate covered pretzels, twizzlers...and my latest experiment...


Though these do not take the place of the ooey-gooey layers of deliciousness...they certainly hit the spot and are a lot less messy! Not to mention E-A-S-Y! All you need to do is melt some chocolate chips in a double boiler, slide the marshmallow on a stick, roll it in chocolate, then in graham cracker crumbs. Done and Done! So simple, so yummy. What more can you ask for? Milk perhaps? Yes. Definitely milk. I used toothpicks this time, since it was just my beta test, but next time I will use standard lollipop sticks....and maybe double-marshmallow-it...just a thought!

Over all, it was a crowd pleaser...so much so that little visitors were sneaking a taste!

Kid tested. Grasshopper approved.


Thanks for stopping by! :-)

8.18.2010

National Cupcake Day!

On the way to work today I heard on the radio that it is National Cupcake Day! JOY! What could make for a better day than that? As I allowed myself to daydream about all the types of cupcakes I could make today, I was snapped back into reality when I remembered that I was on my way to work and therefore would not get to make any sweet treats. Silly adulthood getting in the way of my fun! So instead, I decided to dig up something out of the archives to share with you in celebration of this yummy day! So here goes...


This is a project I did at the beginning of the year and not only was it a super delicious idea, but educational to boot! I'm sure lots of people have done this one before, but I still thought I would share my experience! Basically, I made a boxed vanilla cake mix (fancy fancy, I know), divided it into 6 bowls and made three of them into the primary colors with food (gel) coloring. I talked to the kids about primary and secondary colors, showing them the color wheel and all...but for some reason they were eager for me to get on with it...hmmm. They weren't even very interested in my song!


Pretty, right?! After we mixed all the colors and I felt like they got the basic concept, we used spoons to glob the batter into muffin tins. And yes, glob is a technical term :-)  The older kids liked to layer, making rainbows and patterns, but the younger kids enjoyed a more tie-dye-ish effect.


Mmm mmm good! Abby was very upset that we did not make pink batter, so we made pink icing instead. A good compromise, I'd say. This is an awesome rainy day activity...or a sunny day...or snowy. Heck, cupcakes are good anytime, I won't discriminate.

I wonder what special day tomorrow will bring?!

Happy baking! And happy National Cupcake Day!

8.16.2010

Tasty treats fit for a Princess!


Last weekend, a very special Birthday Princess turned (believe it or not!) TWO! For weeks, her sweet Mommy planned a luau bash to celebrate and did a fantastic job of creating a Hawaiian oasis for all the guests! It was my pleasure to make a tasty treat or two to share, in hopes of a Birthday Girl Hug...In the end, I didn't get my hug, but we've worked up to the "high five." Hey, it's progress. :-)


Life's a beach, no? I cannot take credit for the windsurfer, that was all SP. Oh and you would not believe how difficult it is to find cocktail umbrellas in August! Sheesh! I went to more stores than I care to admit, but it all worked out in the end. These Teddy Bears had the time of their lives catching some rays...and some waves. They even had time for a little volley ball. The little lady under the umbrella...now there's a bear after my own heart. Love it. 


I was so pleased to see that this one seemed to be a hit! When they brought it down the stairs from the house to put it on the dessert table, some one turned to me and said "Oh, how lovely!" I looked up to say thank you and saw that all the chocolate covered strawberries had been eaten before it hit the table! hehe. Guess I know what to make more of the next time! So glad everyone liked it! 


And every Birthday Princess needs gifts all in pink! I got the idea for the hook from Posh Pieces, here. Unfortunately, I cannot remember where I saw the silhouette! I'm really happy with the way these turned out! Oh pink and brown...you are a match made in heaven! And the best part is that Avra's room was just redecorated in a Tinker Bell theme so her gifts will match! Yippy!

I hope to put together a few tutorials soon, but I need to start remembering to take pictures when I am in the process...not just of the final products! Live and learn!

Thanks for visiting! Come back soon :-) 

8.15.2010

What's in a name?

I've wanted to create this blog for quite a while now, but my tech skills ran for the hills when I saw all that could be involved...leaving me rather overwhelmed, to say the least. SP, being the patient hubby that he is, decided that this weekend we would sit down and figure it out together. Well, here we are, and it wasn't that bad! I still have a lot to learn, but I think I'll get it together! 


Over the last year or so I have toyed around with different ideas for blogs, but could never settle on just one! Should I write one on cooking? Baking? Crafting? Kids stuff? Decorating? Then a few weeks ago, as I was once again stressing over this decision making process, I said to myself, "Why choose, when I can have it all?"And then came the problem of a name. Every good blog needs a great name! It had to be something memorable, but also meaningful; Something short, but descriptive. I brainstormed for a while, came up with a few names that I liked, but didn't love...and then SP walked in the room and (half-jokingly) suggested "Wingledings." Wingledings and other things. Genius. I instantly grabbed my laptop, Googled the name. Nothing. Awesome! I hopped on Blogspot, created my account, and the rest is history. 


Now where, you ask, did he come up with such a name? That's a good story too. When my MIL was little, her mom used to make these amazing cookies that she dreamed up. They didn't have a name, so her husband began to call them Wingledings. The name stuck and four decades later, the same cookies grace the Christmas table with their yumminess each year. When SP and I started dating, I knew I was meant to join his family the moment I tasted these cookies. They are heaven in a square. Seriously. They are de-licious. So SP and I decided that it would be a nice tribute to his grandparents to name my work after their creation. So Grandma and Grandpa T, this one's for you.


**Just in case you are wondering, no, I will not be sharing the recipe. That one's not my secret to share.**