8.15.2012

Sassy Cilantro Salad

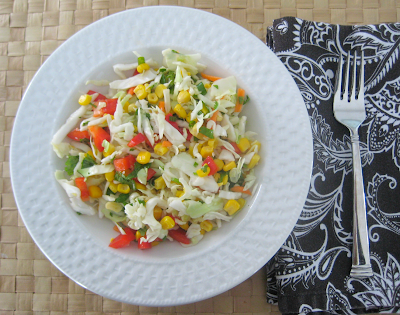
I don't know what's sassy about it...but it's catchy, isn't it? And OH. MY. GOSH is it tasty!

This is one of my favorite foods. Hands down. It's fresh, flavorful, and fast! I'm just full of alliteration today! (alliterations? hmmmm)  While most of the ingredients are not ones you commonly have on hand, they are easy to find and inexpensive. Still a win in my book.

Look at that. It's a thing of beauty, don't you think?


Wanna know how to make it? I know you do.

Sassy Cilantro Salad
Ingredients:

1 bag cole slaw mix with carrots
1 red bell pepper, diced
1 cup green onions, sliced
1 cup cilantro, chopped
1 can sweet corn, drained
1/2 cup rice vinegar
1/4 cup sugar, Splenda, or equivalent amount of sweetener of your choice

Directions:

1. Toss all vegetables together in a large bowl and set aside.
2. Mix vinegar and sweetener in a small bowl and pour over salad.
3. Toss to combine.
4. Serve immediately or chill. For best results, chill for at least 30 minutes before serving.


Better late than never.

I cannot believe it has taken me 2 months to introduce the new man in my life. Life has been crazy. We've been adjusting to a new (not) sleeping schedule, visiting with friends and family, vacations, weddings, friends' babies, Pete going back to work, and just simply ignoring all other responsibilities to stare at this face for hours a day.


I am overjoyed to welcome Benjamin into our little family. Life has never had more meaning. More excitement. More worth. He is everything I've ever dreamed and hoped for and I'm so wildly blessed to call him mine. Well, ours. And Pete's when he needs to be changed ;) hehe

Benny joined our family June 15, 2012 at 6:08pm. He weighed in at a whopping 8lbs 12oz...and yes, we had a natural birth. Seems to be the first question people ask. haha I've had many pats on the back and "you brave girl" looks. haha


While the delivery was fairly quick, all things considered, it was definitely not easy. There were moments I truly feared having to walk away without my son, but my doctor is AMAZING and he managed to keep us both safe and make us a family. My recovery was difficult, it took me 2 weeks to be able to walk around the house on my own without being in immense pain. It was frustrating to have this perfect little bundle and not be able to care for him the way I wanted to. But we have a wonderful support system and I didn't have to worry about a thing. I would just sit in my chair and stare in wonder at this perfect little life in my arms. I don't think I looked at him once in his first month of life without tears coming to my eyes. I just can't believe he's finally here. I'd do it all again in an instant. No question.


We are so in love. It's only been two months since that first car ride home, but feels like he's been here forever...in a good way. He just slipped into our lives and fit in perfectly. It has taken some time learning how to be social again. I can't honestly say I'm there yet. But we're working on it. 


I won't be adding too many updates to Wingledings about Ben, but if you'd like you can follow along on our baby blog...I will add the link soon, it's not quite ready. Soon though. Promise.

I'm happy to be back to blogging...though I'm sure I won't have nearly the same amount of time to devote to Wingledings. I just need to get better at writing/editing quickly. 

Slap that on the "to-do" list ;) 


Sweet, sleepy baby Ben. We are so happy to know you.


5.15.2012

Cheddar Bay Biscuits

First, a rant: 

I miss Picnik!! I'm SO annoyed they closed the site!! I can't edit any of my photos unless I want to use Photoshop and honestly, I just don't have the patience for that all the time. I loved being able to quickly upload and tweak a picture with next to no effort. And now it's all gone :( The programs they suggested stink...leaving me with unedited photos and a sad heart. Oh well. I'm sure someone will come up with something similar soon. I'll just wait it out. I wish they would allow us to buy it. I would in a heartbeat!

Ok, guess that's out of my system. Now on to the recipe!

The other day, my cheese-loathing husband asked me if I could recreate the biscuits that Red Lobster gives out before your meal comes. I said sure, without really thinking because he rarely asks for anything and I like to keep my man happy :) 

Once I started thinking about it, I was nervous that I wouldn't be able to make good on my promise...Not having been to Red Lobster in, gosh, 15 or so years, I was nowhere near confident I even remembered what they were, let alone create a recipe to replicate them! And what made him think of these, I'll never know! Commercial maybe? Regardless...I got to work...and by that, I mean I pulled up trusty old google and searched my butt off. Oh Internet, how I love you.

These came out awesome and really added some pizzazz to the otherwise lame dinner I made that night. Hey all my efforts went into the biscuits...that counts for something, right?! :) Either way, they were delicious and he loved them. Win. Win. 

Cheddar Bay Biscuits 


Ingredients:
2 ½ cups Bisquick baking mix
¾ cup cold whole milk
4 tablespoons cold butter
¼ teaspoon garlic powder
1 heaping cup grated cheddar cheese

Bush on Top:
2 tablespoons butter, melted
¼ teaspoon dried parsley flakes
½ teaspoon garlic powder 
pinch salt

Directions:

1. Preheat your oven to 400 degrees.
2. Combine Bisquick with cold butter in a medium bowl using a pastry cutter or a large fork. (I used a food processor) You don't want to mix too thoroughly. There should be small chunks of butter in there that are about the size of peas. Add cheddar cheese, milk, and ¼ teaspoon garlic. Mix by hand until combined, but don't over mix.
3. Drop approximately ¼-cup portions of the dough onto an ungreased cookie sheet using an ice cream scoop.
4. Bake for 15 to 17 minutes or until the tops of the biscuits begin to turn light brown.
5. When you take the biscuits out of the oven, melt 2 tablespoons butter is a small bowl in your microwave. Stir in ½ teaspoon garlic powder and the dried parsley flakes. Use a brush to spread this garlic butter over the tops of all the biscuits. 

 Makes one dozen biscuits.


5.09.2012

Asparagus Risotto

How does this always happen? 

I get all excited that I have post, after post, after post to share...but weeks go by and nothing gets written?! Bad blogger! Sheesh! 

I have just been so busy getting ready for this tiny man that posts have fallen to a distant last on the "to-do" list. While I LOVE blogging and crafting, we've been spending most of our limited free time praying for, reading to, and loving on this guy. (And no, that's not my man hand. It belongs to the ecstatic daddy-to-be!) I feel like I need to soak up every last moment of relaxation I can and enjoy every kick while I can still have him this close to me. Soon these moments of peaceful joy will be replaced by a new kind of joy...a more tiring variety, I expect ;) 


BUT here I am. With 30 minutes to spare before I need to pick up a few cute monsters from the bus stop and said to myself...that's just enough time to write about my delicious lunch! 

For my birthday, my friends surprised me at my favorite restaurant with a wonderful birthday dinner. It was a blast and oh so very yummy! Two of us split this to-die-for risotto and I have been thinking of it ever since! I've only recently tried risotto and have decided, what's not to like?! It's kind of like pasta. Sort of like rice. Smothered in cheese. And in this case...asparagus. 

Oh yeah.


Creamy Asparagus Risotto
Recipe adapted from here

6-8 stalks of asparagus

3 Tbsp. plus 1 Tsp. (light) butter
1/2 small sweet onion, diced
1 cup Arborio rice
1/3 cup dry white wine, I used cooking wine
2 Tbsp cooking Sherry
3 1/2 cups fat free chicken stock
¼-1/2 cup freshly grated Parmesan cheese
salt and pepper

Instructions:


  1. Break off tough ends of the asparagus and cut into ½ inch pieces, or larger if you’d prefer. Boil water in a medium saucepan and blanch the asparagus pieces for 2-3 minutes.  Drain and quickly place in an ice bath to stop cooking. Asparagus will remain green and vibrant. Set aside.
  2. In a medium saucepan, melt 3 Tbsp butter over medium-low heat. Add onion and cook until translucent. Pour in rice and cook for 2 minutes more, stirring until nicely coated.
  3.  While the shallots are cooking, bring the stock to a simmer in a saucepan.
  4. Add the wine and sherry. Slowly stir, allowing the rice to absorb the wine.  Once the wine is almost completely absorbed, add 1/2 cup of stock to the rice. Continue to stir until the liquid is almost completely absorbed, add another ½ cup of rice and continue in this pattern until all stock is used. Stir frequently, rice will stick to the bottom of the pan. After 15-20 minutes, the liquid should be absorbed rice will be tender. Remove from heat.
  5. Gently stir in the Parmesan cheese to taste. My cheese was strong, so I only used a little more than ¼ cup. Add butter and asparagus and stir gently to combine. Salt and pepper to taste.


border:1px solid #; -webkit-border-radius: 100px; -moz-border-radius: 100px; border-radius: 100px;

3.06.2012

Army Man Cupcakes

I'm currently a nanny for a family of three children, two boys (11 & 9) and one girl (3). A few weeks ago, as he's running out the door to catch the bus, the 9 year old requested army and camouflage cupcakes for his family birthday party...that night. I had about a billion errands to run that day as well as a pile of sports uniforms to wash for weekend games/practices, but I had to give it a try. He hardly asks for anything and is such a sweet boy! With my limited time, he had to settle for a boxed cake mix..but I did manage to make homemade buttercream frosting. 

Don't judge me for the picture...it was taken with my dying blackberry and is horribly blurry! But it gives you an idea of how they came out! I forgot to take a picture of the camo ones, but they came out ok. A little more like a globe than camo, but he didn't mind. 


It was super simple too! I just crushed up a bunch of oreos and rolled the frosted cupcake in them...and stuck an army guy down inside so it looked like he was hiding in the mud. They were a big hit and he was thrilled!

He later told me that I would win in an awesome contest...as the "Awesomest Nanny Ever"

Score!

It's amazing how a simple gesture can make a child's day :)

3.02.2012

Cupcake Quilt

SO I'm going to be honest...I did this project a WHILE ago! In fact, the baby that this was made for is now 6 months old...and this was her shower gift. YIKES! But as I mentioned, there's been a lot going on recently, so I can't get too bent out of shape over it ;-) 

So once upon a time...my lovely cousin was having baby! For her "sprinkle" I wanted to make her and the baby something special..one of a kid and from the heart! 

So I thought for a while and this is what I came up with!


The best part is, it turned out so close to what was in my head! That almost never happens. Know what I mean? I always seem to come up with these ideas and I get so excited about them but they hardly ever come out the way I had hoped. Not this time! I was really pleased! And it was soooo simple...other than the fact that I didn't know how to quilt. Details. Details. But even that turned out ok! 


I went to Christmas Tree Shop to get an inexpensive lamp shade. As a matter of fact, the Mommy-to-be-again, was shopping with me. She probably wondered why I was buying such a boring shade! Now since I used hot glue, I had to work quickly so these are the only pictures I have. But seriously, you don't need them. It wasn't hard. I just measured the shade from top to bottom...which luckily for me was 12 inches so I didn't have to cut my paper! I folded the paper like an accordion, every 3/4 inch or so and hot glued them to the shade. Easy peasy! 


The quilt on the other hand was harder for me since the only one I've ever made was TINY and several years ago. I played around with some patterns, but ended up going for tried and true...squares! Just to ensure that this pretty Mama actually received a gift on time. haha I fell in love with the pattern of the polka dot fabric and since it the gender was a secret, I thought it would be a good choice! 


I was so thrilled with the way it came out..and having some left over red felt and a fake flower stem was just the "cherry on top." HA! Sorry, bad pun. But that's all it was really, a little red felt sewn into a circle and a fake flower stem that I clipped the flower off of and hot glued it inside. Done and done. 

Here's the woman of the day and her giant cupcake!
(I promise she's not naturally this orange!)


I think she liked it! And thought it was...dare I say..."Sweet?" 

2.27.2012

Hello again!

After a very, very long absence, I'm happy to say that I am back to blogging! It has been a busy and challenging (both good and bad) few months...but I am ready to share some of my crafts, recipes, and excitement with you all! 

The first project I'd like to show off is my biggest yet!! 

So big, in fact, that it won't be complete until June!

Source

SQUEAL!! 

And guess what?!


It was rocky for the first trimester, which I'll share later, but we are doing great now! I'm looking forward to writing about some other projects I've been working on now that I am feeling better and my energy is back! So come back and visit soon!!

*Sigh*

 It feels good to be back!!