9.01.2015

Zucchini Corn Pancakes

This summer our family joined a few friends and participated in a CSA  (Community Supported Agriculture - Google it, it's pretty neat!) through a local farm. It has been such an awesome experience so far,  I only wish we'd joined earlier in the season!

Basically, every week my hubby picks up a pre-packaged box of fruits and veggies grown on their farm. 

 This beautiful bunch of goodness and all its weekly friends have not only changed the way we eat, but how I meal plan and cook as well. And as an added bonus, it has slashed our grocery bill to pieces. I now buy our meat at Costco ($45 gets about 10-12 meals) and produce comes through the CSA- this week I spent $12 at the grocery store. I know that doesn't mean much if you don't know what we are having for the week so here's a snapshot: 

Sunday: Going away dinner (out) for my little bro who is leaving for college in the Big City

Monday: Chicken, Apple and Gouda sausage sandwiches with peppers and onions with zucchini corn pancakes 

Tuesday: Ratatouille Baked Ziti and a salad and a fresh peach crisp 

Wedneaday: Korean Beef Bowl with green beans and carrots over rice 

Thursday: leftover Ratatouille Ziti and a salad

Friday: Taco Rice and tortilla chips with guacamole 

Saturday: Pork loin with sweet potatoes and peaches and a salad and homemade peach froyo 

And there you have it :) Nothing overly exciting but each meal is satisfying, relatively healthy (or at least balanced), and kid friendly. On Mondays the farm puts out a tentative list of what will be in the box for the week. I pull it up and make meals based on what we will receive - sometimes I have to get rather creative because I may find something like that octopus in the front....


That's a kohlrabi and it's one of my new favorites!  So delicious roasted with radishes and mushrooms in olive oil and rosemary.  Oh so yum! 

So I've had to come up with ways to use an abundance of certain veggies like squash and corn... *enter pancakes!*

Zucchini and Corn Pancakes

Only slightly adapted from here

Yields: About 10 pancakes

Ingredients:
4 large eggs, beaten
Slightly less than 1/4 cup olive oil
1.5 tsp salt
1/4 tsp ground pepper
1 tsp dried basil
1 tsp dried oregano
3 cups grated zucchini (about one large zucchini)
1 cup fresh sweet corn off the cob or frozen 

1 cup mozzarella cheese (or your favorite cheese)

1 cup unbleached all-purpose flour

3/4 cup whole wheat flour

Directions:
In a large bowl, combine eggs, oil, salt, pepper and dried herbs. Whisk to combine.
Add the zucchini, corn and cheddar cheese and stir thoroughly with a spatula.
Add the flour and stir until thoroughly combined and there are no pockets of dry flour hiding in the batter.
Heat a skillet medium-high heat, adding a very small amount of oil. Scoop 1/4-cupfuls of batter onto the skillet and flatten, if necessary, with the back of the scoop into a circle about 4 inches in diameter. Cook on each side about 3-4 minutes, or until a deep golden brown. Remove from skillet and transfer to a plate. Repeat with remaining batter.
Serve warm with your favorite toppings (I’m partial to salsa and sour cream).

7.02.2015

Sweet and Sour Cucumber Salad

So I've had to come to grips with the fact that I will probably never have enough time to blog the way I used to- babies, real house life, and working full-time are here to stay for a while at least. But in my time home awaiting the arrival of #2, I figured why not post a bit even if they won't be perfect or as exciting as I'd like.

So here goes, sub-par cellphone photos and all ;)

A random dinner from last week: Chicken Satay, cilantro lime rice, and a sweet and sour cucumber, carrot and chickpea salad. I could eat that salad until I pop...which these days seems like a real possibility!


The chicken satay..can't take much credit...jar mix. Cilantro lime rice was just that - rice mixed with fresh cilantro and lime juice. But the salad....oh the salad. That was a Pintrest find I adapted to match what I had on hand. Only slightly. So, so good. Link to original below. 

Ingredients:

3 TBSP fresh lemon juice
3 TBSP extra virgin olive oil
2 TBSP rice vinegar
¼ tsp salt [plus extra, to taste]
⅛ tsp dill [fresh or dried]
1/4 tsp garlic powder
2 cups chickpeas
¼-1/2 cup fresh chopped cilantro, plus extra to garnish
1.5 large cucumbers
1 cup chopped red bell pepper
2-3 carrots
2 TBSP honey
2 TBSP apple cider vinegar
1 TBSP sesame seeds

Instructions:
Combine lemon juice, olive oil, rice vinegar, garlic powder, dill, salt, and garlic. Wisk to emulsify.
In a medium bowl add chickpeas, minced onion, chopped bell pepper, ½ an English cucumber [chopped] and cilantro.

Pour in dressing and mix thoroughly. The longer you allow them to marinate the more intense the flavor will be!

Next, using a spiralizer or tool of choice curl one cucumber and 2-3 carrots into raw spiral noodles- or you can chop them up or even use a veggie peeler for "noodles"

Whisk together 2 tablespoons of honey with 2 tablespoons of apple cider vinegar and pour over salad.
Top with extra chopped cilantro and a hearty sprinkle of sesame.


Click here for the Original Recipe

4.09.2013

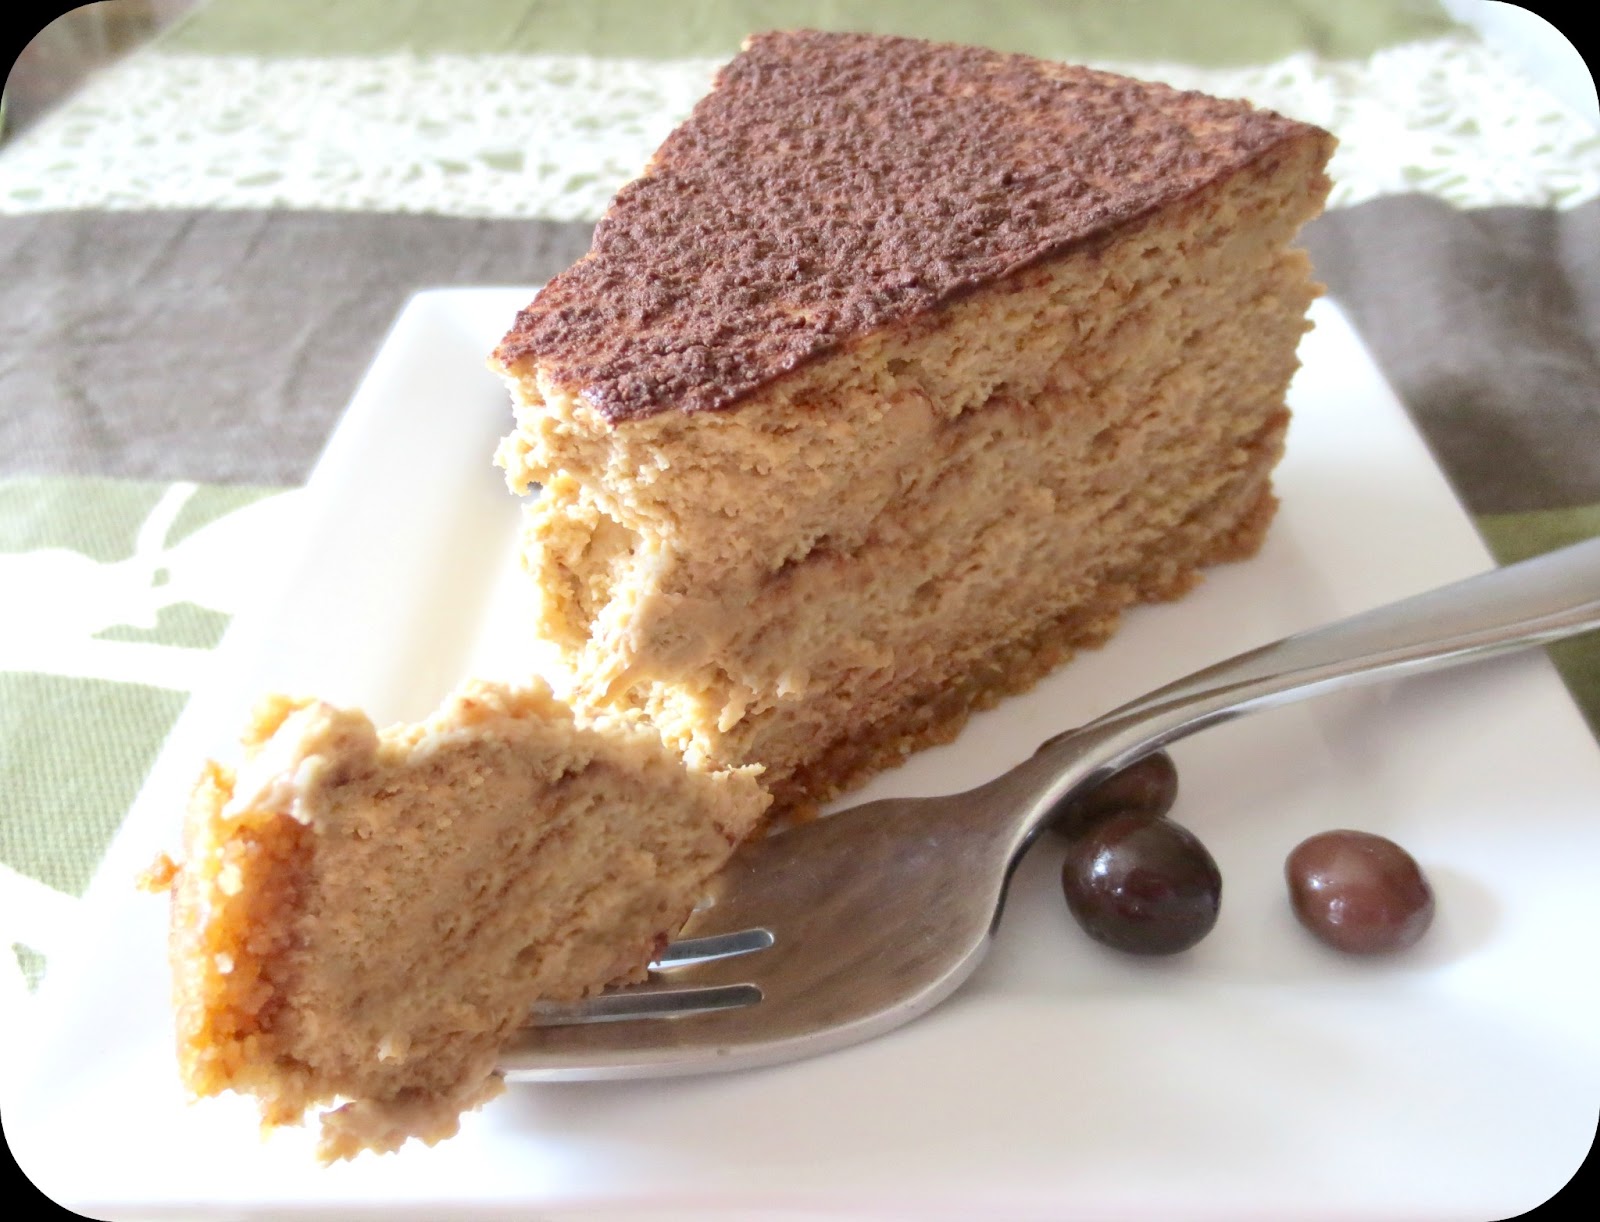
Tiramisu Cheesecake

It's been so long since I've posted I struggled to find a good transitional post to get back into the swing of blogging-hopefully. I know I've said it before, and if I'm being honest with myself, I will likely say it again. I guess it's no surprise that blogging has fallen drastically on my priority list as a new mom, with a full-time job (even if it's from home), a hubby working on his CFP certification, and a baby that (while adorable) will not sleep for beans.

That being said, I miss it terribly! I'm constantly taking pictures and even editing them just to have them sit in a file marked "to blog" for all eternity. But I'm going to try, really, really try this time. Everyone needs a little outlet and this is mine. I know it may seem silly, what do I really say on here? Not much. A recipe here. A craft there. Soon to be motherly anecdotes about our adventures, I'm sure. But it's a place to express myself in those ways, which makes me happy. 

We had a wonderful Easter celebration this past weekend!
(HA it took me a week to write this-even after my promise. Not a great sign) 
Ben loved welcoming new members to his duck family. 
(He kisses each one and touches their beak to make sure they're really ducks)
 He's seriously obsessed. It's cute.


We went on a family playground adventure. And he liked it a little more than it looks in the photos. Only a little more though. Not quite warm enough just yet! 


Then we visited with both sides of our families for a holiday meal. Pete was honored to kick off the Sunrise Service at our church, even though that meant a 4:30 "wake up" call after a rough night. I use the term "wake up" loosely as I believe you have to sleep in order to wake up. Thanks Bug. We still love you.


Other than that, we have just been loving watching our little mushy baby boy grow into a sweet, curious little toddler. 


He's a mellow kid with the heart of a tiny explorer. You can find him chilling in his ball pit. Riding around in his new wheels. Or maybe banging on some drums in music class. 'Cause that's how he rolls. 

Ok, enough with the mom gushing. I love that little man to pieces, but the main reason for my post is this little beauty. 


 Ohhhh, yeaaaahhhhhh! I went there. Creamy filling. Sweet graham cracker crust. 

 Chocolate dusting covering all imperfections luring you in for that first bite. 


Want to make it right now?? Of course you do. 

The only thing is- this one tastes better once it has been chilled for at least a day. Quite honestly, it was the best several days later. Like 3. 

Richer
Creamier
Better. 


I recommend making it a few days before you need it. Trust me. 


Tiramisu Cheesecake 

(Original Source only slightly adapted)

For the crust:

1 ½ cups ground graham crackers
3 tablespoons granulated sugar
6 tablespoons butter, melted

For the cheesecake:
2 ½ pounds cream cheese, at room temperature (I used half low fat and half regular to cut calories/fat a bit!)
1 cup granulated sugar
2 eggs, at room temperature
3 egg yolks, at room temperature
3 tablespoons cornstarch
4 tablespoons Kahlua
4 teaspoons espresso coffee powder (I used a mix of instant coffee/espresso powder-because I ran out!)

1 tablespoon unsweetened cocoa powder
1 teaspoon powdered sugar 
Sweetened whipped cream, for the garnish

Preheat oven to 375ºF and butter the bottom of a 9-inch spring form pan
Mix together the cookie crumbs, sugar and melted butter.  Press into the spring form pan, going up the side of the pan only 1/4 inch.  Bake 8 minutes.  Cool completely.
Decrease oven temperature to 325ºF
In a stand mixer with a paddle attachment, cream the cream cheese until it’s smooth.  Add the sugar and mix together.  Add the eggs and yolks one at a time; mix each in before adding the next. Add the cornstarch and mix together. In a small bowl combine the Kahlua and coffee powder and stir until the coffee powder has dissolved.  Add to the cream cheese mixture and mix together. 
Wrap two layers of aluminum foil around the sides of the spring form pan.  Pour the cheesecake filling into the pan on top of the cooled crust.  Bake in a water bath for 55-60 minutes.  The outer edges should be set and the center will still jiggle a little when you move it.  (The cake continues cooking after it’s removed from the oven.)  Cool for 30 minutes, then remove the spring form rim.  Cool completely, then place into the refrigerator for at least 8 hours, overnight is best. 
Right before serving, mix the cocoa powder and powdered sugar and sprinkle over the cheesecake and serve with whipped cream.  


8.15.2012

Sassy Cilantro Salad

I don't know what's sassy about it...but it's catchy, isn't it? And OH. MY. GOSH is it tasty!

This is one of my favorite foods. Hands down. It's fresh, flavorful, and fast! I'm just full of alliteration today! (alliterations? hmmmm)  While most of the ingredients are not ones you commonly have on hand, they are easy to find and inexpensive. Still a win in my book.

Look at that. It's a thing of beauty, don't you think?


Wanna know how to make it? I know you do.

Sassy Cilantro Salad
Ingredients:

1 bag cole slaw mix with carrots
1 red bell pepper, diced
1 cup green onions, sliced
1 cup cilantro, chopped
1 can sweet corn, drained
1/2 cup rice vinegar
1/4 cup sugar, Splenda, or equivalent amount of sweetener of your choice

Directions:

1. Toss all vegetables together in a large bowl and set aside.
2. Mix vinegar and sweetener in a small bowl and pour over salad.
3. Toss to combine.
4. Serve immediately or chill. For best results, chill for at least 30 minutes before serving.


Better late than never.

I cannot believe it has taken me 2 months to introduce the new man in my life. Life has been crazy. We've been adjusting to a new (not) sleeping schedule, visiting with friends and family, vacations, weddings, friends' babies, Pete going back to work, and just simply ignoring all other responsibilities to stare at this face for hours a day.


I am overjoyed to welcome Benjamin into our little family. Life has never had more meaning. More excitement. More worth. He is everything I've ever dreamed and hoped for and I'm so wildly blessed to call him mine. Well, ours. And Pete's when he needs to be changed ;) hehe

Benny joined our family June 15, 2012 at 6:08pm. He weighed in at a whopping 8lbs 12oz...and yes, we had a natural birth. Seems to be the first question people ask. haha I've had many pats on the back and "you brave girl" looks. haha


While the delivery was fairly quick, all things considered, it was definitely not easy. There were moments I truly feared having to walk away without my son, but my doctor is AMAZING and he managed to keep us both safe and make us a family. My recovery was difficult, it took me 2 weeks to be able to walk around the house on my own without being in immense pain. It was frustrating to have this perfect little bundle and not be able to care for him the way I wanted to. But we have a wonderful support system and I didn't have to worry about a thing. I would just sit in my chair and stare in wonder at this perfect little life in my arms. I don't think I looked at him once in his first month of life without tears coming to my eyes. I just can't believe he's finally here. I'd do it all again in an instant. No question.


We are so in love. It's only been two months since that first car ride home, but feels like he's been here forever...in a good way. He just slipped into our lives and fit in perfectly. It has taken some time learning how to be social again. I can't honestly say I'm there yet. But we're working on it. 


I won't be adding too many updates to Wingledings about Ben, but if you'd like you can follow along on our baby blog...I will add the link soon, it's not quite ready. Soon though. Promise.

I'm happy to be back to blogging...though I'm sure I won't have nearly the same amount of time to devote to Wingledings. I just need to get better at writing/editing quickly. 

Slap that on the "to-do" list ;) 


Sweet, sleepy baby Ben. We are so happy to know you.


5.15.2012

Cheddar Bay Biscuits

First, a rant: 

I miss Picnik!! I'm SO annoyed they closed the site!! I can't edit any of my photos unless I want to use Photoshop and honestly, I just don't have the patience for that all the time. I loved being able to quickly upload and tweak a picture with next to no effort. And now it's all gone :( The programs they suggested stink...leaving me with unedited photos and a sad heart. Oh well. I'm sure someone will come up with something similar soon. I'll just wait it out. I wish they would allow us to buy it. I would in a heartbeat!

Ok, guess that's out of my system. Now on to the recipe!

The other day, my cheese-loathing husband asked me if I could recreate the biscuits that Red Lobster gives out before your meal comes. I said sure, without really thinking because he rarely asks for anything and I like to keep my man happy :) 

Once I started thinking about it, I was nervous that I wouldn't be able to make good on my promise...Not having been to Red Lobster in, gosh, 15 or so years, I was nowhere near confident I even remembered what they were, let alone create a recipe to replicate them! And what made him think of these, I'll never know! Commercial maybe? Regardless...I got to work...and by that, I mean I pulled up trusty old google and searched my butt off. Oh Internet, how I love you.

These came out awesome and really added some pizzazz to the otherwise lame dinner I made that night. Hey all my efforts went into the biscuits...that counts for something, right?! :) Either way, they were delicious and he loved them. Win. Win. 

Cheddar Bay Biscuits 


Ingredients:
2 ½ cups Bisquick baking mix
¾ cup cold whole milk
4 tablespoons cold butter
¼ teaspoon garlic powder
1 heaping cup grated cheddar cheese

Bush on Top:
2 tablespoons butter, melted
¼ teaspoon dried parsley flakes
½ teaspoon garlic powder 
pinch salt

Directions:

1. Preheat your oven to 400 degrees.
2. Combine Bisquick with cold butter in a medium bowl using a pastry cutter or a large fork. (I used a food processor) You don't want to mix too thoroughly. There should be small chunks of butter in there that are about the size of peas. Add cheddar cheese, milk, and ¼ teaspoon garlic. Mix by hand until combined, but don't over mix.
3. Drop approximately ¼-cup portions of the dough onto an ungreased cookie sheet using an ice cream scoop.
4. Bake for 15 to 17 minutes or until the tops of the biscuits begin to turn light brown.
5. When you take the biscuits out of the oven, melt 2 tablespoons butter is a small bowl in your microwave. Stir in ½ teaspoon garlic powder and the dried parsley flakes. Use a brush to spread this garlic butter over the tops of all the biscuits. 

 Makes one dozen biscuits.


5.09.2012

Asparagus Risotto

How does this always happen? 

I get all excited that I have post, after post, after post to share...but weeks go by and nothing gets written?! Bad blogger! Sheesh! 

I have just been so busy getting ready for this tiny man that posts have fallen to a distant last on the "to-do" list. While I LOVE blogging and crafting, we've been spending most of our limited free time praying for, reading to, and loving on this guy. (And no, that's not my man hand. It belongs to the ecstatic daddy-to-be!) I feel like I need to soak up every last moment of relaxation I can and enjoy every kick while I can still have him this close to me. Soon these moments of peaceful joy will be replaced by a new kind of joy...a more tiring variety, I expect ;) 


BUT here I am. With 30 minutes to spare before I need to pick up a few cute monsters from the bus stop and said to myself...that's just enough time to write about my delicious lunch! 

For my birthday, my friends surprised me at my favorite restaurant with a wonderful birthday dinner. It was a blast and oh so very yummy! Two of us split this to-die-for risotto and I have been thinking of it ever since! I've only recently tried risotto and have decided, what's not to like?! It's kind of like pasta. Sort of like rice. Smothered in cheese. And in this case...asparagus. 

Oh yeah.


Creamy Asparagus Risotto
Recipe adapted from here

6-8 stalks of asparagus

3 Tbsp. plus 1 Tsp. (light) butter
1/2 small sweet onion, diced
1 cup Arborio rice
1/3 cup dry white wine, I used cooking wine
2 Tbsp cooking Sherry
3 1/2 cups fat free chicken stock
¼-1/2 cup freshly grated Parmesan cheese
salt and pepper

Instructions:


  1. Break off tough ends of the asparagus and cut into ½ inch pieces, or larger if you’d prefer. Boil water in a medium saucepan and blanch the asparagus pieces for 2-3 minutes.  Drain and quickly place in an ice bath to stop cooking. Asparagus will remain green and vibrant. Set aside.
  2. In a medium saucepan, melt 3 Tbsp butter over medium-low heat. Add onion and cook until translucent. Pour in rice and cook for 2 minutes more, stirring until nicely coated.
  3.  While the shallots are cooking, bring the stock to a simmer in a saucepan.
  4. Add the wine and sherry. Slowly stir, allowing the rice to absorb the wine.  Once the wine is almost completely absorbed, add 1/2 cup of stock to the rice. Continue to stir until the liquid is almost completely absorbed, add another ½ cup of rice and continue in this pattern until all stock is used. Stir frequently, rice will stick to the bottom of the pan. After 15-20 minutes, the liquid should be absorbed rice will be tender. Remove from heat.
  5. Gently stir in the Parmesan cheese to taste. My cheese was strong, so I only used a little more than ¼ cup. Add butter and asparagus and stir gently to combine. Salt and pepper to taste.


border:1px solid #; -webkit-border-radius: 100px; -moz-border-radius: 100px; border-radius: 100px;

3.06.2012

Army Man Cupcakes

I'm currently a nanny for a family of three children, two boys (11 & 9) and one girl (3). A few weeks ago, as he's running out the door to catch the bus, the 9 year old requested army and camouflage cupcakes for his family birthday party...that night. I had about a billion errands to run that day as well as a pile of sports uniforms to wash for weekend games/practices, but I had to give it a try. He hardly asks for anything and is such a sweet boy! With my limited time, he had to settle for a boxed cake mix..but I did manage to make homemade buttercream frosting. 

Don't judge me for the picture...it was taken with my dying blackberry and is horribly blurry! But it gives you an idea of how they came out! I forgot to take a picture of the camo ones, but they came out ok. A little more like a globe than camo, but he didn't mind. 


It was super simple too! I just crushed up a bunch of oreos and rolled the frosted cupcake in them...and stuck an army guy down inside so it looked like he was hiding in the mud. They were a big hit and he was thrilled!

He later told me that I would win in an awesome contest...as the "Awesomest Nanny Ever"

Score!

It's amazing how a simple gesture can make a child's day :)

3.02.2012

Cupcake Quilt

SO I'm going to be honest...I did this project a WHILE ago! In fact, the baby that this was made for is now 6 months old...and this was her shower gift. YIKES! But as I mentioned, there's been a lot going on recently, so I can't get too bent out of shape over it ;-) 

So once upon a time...my lovely cousin was having baby! For her "sprinkle" I wanted to make her and the baby something special..one of a kid and from the heart! 

So I thought for a while and this is what I came up with!


The best part is, it turned out so close to what was in my head! That almost never happens. Know what I mean? I always seem to come up with these ideas and I get so excited about them but they hardly ever come out the way I had hoped. Not this time! I was really pleased! And it was soooo simple...other than the fact that I didn't know how to quilt. Details. Details. But even that turned out ok! 


I went to Christmas Tree Shop to get an inexpensive lamp shade. As a matter of fact, the Mommy-to-be-again, was shopping with me. She probably wondered why I was buying such a boring shade! Now since I used hot glue, I had to work quickly so these are the only pictures I have. But seriously, you don't need them. It wasn't hard. I just measured the shade from top to bottom...which luckily for me was 12 inches so I didn't have to cut my paper! I folded the paper like an accordion, every 3/4 inch or so and hot glued them to the shade. Easy peasy! 


The quilt on the other hand was harder for me since the only one I've ever made was TINY and several years ago. I played around with some patterns, but ended up going for tried and true...squares! Just to ensure that this pretty Mama actually received a gift on time. haha I fell in love with the pattern of the polka dot fabric and since it the gender was a secret, I thought it would be a good choice! 


I was so thrilled with the way it came out..and having some left over red felt and a fake flower stem was just the "cherry on top." HA! Sorry, bad pun. But that's all it was really, a little red felt sewn into a circle and a fake flower stem that I clipped the flower off of and hot glued it inside. Done and done. 

Here's the woman of the day and her giant cupcake!
(I promise she's not naturally this orange!)


I think she liked it! And thought it was...dare I say..."Sweet?" 

2.27.2012

Hello again!

After a very, very long absence, I'm happy to say that I am back to blogging! It has been a busy and challenging (both good and bad) few months...but I am ready to share some of my crafts, recipes, and excitement with you all! 

The first project I'd like to show off is my biggest yet!! 

So big, in fact, that it won't be complete until June!

Source

SQUEAL!! 

And guess what?!


It was rocky for the first trimester, which I'll share later, but we are doing great now! I'm looking forward to writing about some other projects I've been working on now that I am feeling better and my energy is back! So come back and visit soon!!

*Sigh*

 It feels good to be back!!

10.12.2011

Pumpkin Granola

Oh, glorious Fall. I am thoroughly enjoying your presence and all the pumpkin related foods you bring!

I haven't had a lot of luck with granola in the past, mainly because I like it sweet...never want to add enough sugar in hopes of keeping it healthy. I also leave out a lot of the oil usually so it's not as fattening. (At least I can identify my issues...right?! hehe) This recipe is awesome though because it has a lot less sugar (though still a decent amount) and NO oil! Woot woot!! 

So far we've had this in milk, on yogurt, and just for general snacking! It's realllly good!  

Crunchy perfection <3

 Pumpkin Granola 

(Recipe adapted from Two Peas and Their Pod)

Ingredients:

5 cups rolled oats
1.5 teaspoon pumpkin pie spice
1 teaspoon cinnamon
¾ tsp. salt
¾ cup brown sugar, not packed
½ cup pumpkin puree
¼ cup applesauce
¼ cup maple syrup (you can cut this amount down with agave, but I didn't have any on hand)
1 teaspoon vanilla extract
1/2 cup walnuts, chopped
3/4 cup dried cranberries
1/2 cup pepitas (I didn't have any of these, but they would have been yummy!)

Directions:

1. Preheat the oven to 325° F. Line a large baking sheet with parchment paper and set aside.
2. In a large bowl, combine oats, spices, and salt. Mix well.
3. In a medium bowl, whisk together brown sugar, pumpkin puree, applesauce, maple syrup and vanilla extract. Whisk until smooth. Pour wet ingredients into oat mixture and stir until the oats are evenly coated. They will be moist. Evenly spread the mixture onto the prepared baking sheet.
4. Bake for 20 minutes. Remove pan from the oven and stir. Bake for an additional 15-20 minutes or until the granola is golden and crisp. Remove from the oven and stir in dried cranberries and pepitas. Let cool completely. Store in an airtight container.

10.02.2011

Cookie Dough Cupcakes


If there was one treat I wish I could eat...all the time...for no calories...it would be raw chocolate chip cookie dough. mmm At my friend's college, they served partially baked cookie dough in little parchment wrappers...I was always jealous! Last year I found an awesome egg-less cookie dough recipes that I used in truffles and for snacking purposes, but I always wondered how it would taste on a cupcake. Now, if I'm being honest, this recipe is not as good as the eggless cookie dough, but it is really yummy and tastes super great on graham crackers...just saying! I want to try and thin out my other recipe and use that as frosting, but I haven't gotten a chance yet. Don't worry, it will happen.

Cross my heart.

For now, let me share: 

Chocolate Chip Cookie Dough Frosting 
 
*This makes a LOT of frosting, I halved it and it worked fine*


Ingredients: 
  • 3 sticks unsalted butter, at room temperature
  • ¾ cup light brown sugar, packed
  • 3½ cups confectioners’ sugar
  • 1 cup all-purpose flour
  • ¾ tsp. salt
  • 3 tbsp. milk
  • 2½ tsp. vanilla extract 
Procedure

  1. Beat together the butter and brown sugar in the bowl of a stand mixer fitted with the paddle attachment until creamy.
  2. Mix in the confectioners’ sugar until smooth. Beat in the flour and salt. Mix in the milk and vanilla extract until smooth and well blended.
  3. Frost the filled cupcakes as desired, sprinkling with mini chocolate chips and topping with mini chocolate chip cookies for decoration.


Oh yeah, I forgot to mention that I put a piece of cookie dough in the batter before I baked them. It was pretty awesome, but next time, I will fill the cupcake with raw cookie dough. It was lost a little by baking it.  


Don't hate me :)

Crayon Wreath

This is a project I have been waiting to make for a while now, but never had a good reason. Well, my friend Ms. Daly got a job as an elementary school teacher for this school year and I thought it would be perfect for her! She's an extremely bubbly, sweet, and cheerful person...what better to represent her than a happy rainbow wreath?! 


This project required about 64 crayons, two embroidery hoops, and a few embellishments...just for fun! I hope she likes it! I think it's adorable and so happy!


You can't see it in any of these pictures, but there is a little ribbon hook to hang the wreath. I added the ric rack at the last minute, and I'm so glad! I think it really pulls it all together, don't you? I'm super happy with the way it turned out, and that it is going to a good home!


SO this was not the quote I was looking for...I wanted something that was inspiring, happy, or even about teaching...but I stumbled upon this and couldn't stop laughing. Oh Dr. Seuss, I love you.

“In my world, everyone's a pony and they all eat rainbows and poop butterflies!”
                                                                                                                             ― Dr. Seuss

9.09.2011

Sesame Chicken Fake-Out

If you love Sesame Chicken as much as I do, you NEED to try this take-out fake-out! Hubby and I love to get take-out on Friday nights, but since I quit my job to start substitute teaching, I've been trying to find recipes to mimic our favorite dishes on the cheap! So far, this is our favorite! It truly tastes like something you would order from a Chinese food restaurant, but it's sooooo much better for you! 


Sesame Chicken Fake-Out
(Adapted from Melissa d'Arabian)

Ingredients:
  • 3 boneless, skinless chicken breast halves
  • 2 tablespoons soy sauce (I use low sodium)
  • 2 tablespoons apricot jelly or preserves
  • 1 tablespoon white wine
  • 1/2 cup flour
  • 2 tablespoons sesame seeds
  • 3 tablespoons light butter, melted 
  • 1-2 crowns of fresh broccoli or 1 bag frozen, steamed
  • Rice, for serving
Sauce:
  • 2-3 Tbsp soy sauce (I use low sodium) 
  • 3 Tbsp apricot jelly
  • 3 Tbsp white wine
  • ginger to taste
  • 1- 1.5 Tbsp flour
  • 1/4-1/2 cup water

Directions

Preheat the oven to 375 degrees F. Line a large baking sheet with parchment paper or foil with nonstick spray.

Cut the chicken breasts into 1-inch cubes. In a medium bowl, mix together the soy sauce, apricot jelly, and wine. Toss in the chicken cubes and marinate for at least 10 minutes and up to 8 hours in the refrigerator.

In another bowl or plastic bag, mix together the flour and sesame seeds. Drain the chicken cubes and toss in the flour to coat lightly. Spread on the prepared baking sheet and drizzle with the melted butter. Bake until the chicken is crispy but not dry, about 20 minutes, turning the cubes halfway through.

While chicken is in the oven, begin the sauce. In a small saucepan, combine soy sauce, jelly, wine, and ginger. Bring to a simmer over medium-low heat, stirring constantly. Add water as necessary to thin out the sauce. Once it's simmering, reduce the heat. Combine the flour with a tablespoon or so of water to make a thin paste. Slowly add to sauce to thicken into a gravy consistency. Keep warm.

When chicken is cooked through, toss with broccoli and sauce and sprinkle with toasted sesame seeds. Serve with rice.


9.07.2011

Melted Crayon Wall Art

Today was the first day of school for many local kids...and it made me so sad! I wish I could still be in school. In any capacity, really...as a teacher or a student! I used to love the first day of school...new clothes that are waaayy to hot to be wearing in September but they were too cute to fold in a drawer and wait for the chill of Fall to set in. I loved getting a new backpack, notebooks, pens in all different colors. I loved school...in almost every grade (except 5th grade and my freshman year of college...those weren't great years in all honesty) I even miss the butterflies I used to get before I walked into the building...and for the entire night before. One day I will just have to live vicariously through my children on their first days. :) 

Well two of my lovely friends started their first years of teaching today, and I couldn't be more proud! I wanted to make them each something to decorate their walls since they are presumably rather bare this early in the year. Katie, a new Family and Consumer science teacher is going to be working with middle school students, so I needed an idea that wasn't too juvenile...or too much like an inspirational poster. :)

I decided on the melting crayon art that I saw it on Unsimple Living... I've seen it floating around other craft blogs, so I'm not sure where it originated. It seemed perfect for the age group, as well as clever and unique... just like Katie! Perfect!


Isn't it awesome?! I am super happy with the way it came out! Basically, I hot glued crayons to the top of a canvas and using an embossing heat gun I melted them slowly. As they melted, I tilted the canvas back and forth depending on how long I wanted the drips. When all the colors were done cooling, I decided it wasn't exactly like I was hoping...but the addition of "inspire" in that adorable typewriter font was the icing on the cake for me! LOVE.
 

Look at that texture! How cool is that? Ha, I am so happy I tried it! I hope Katie and her students love it as much as I do. 


“A good teacher can inspire hope, 
ignite the imagination, 
and instill a love of learning.” 
- Brad Henry